What went in
- One screenshot of a 16-shot, 7-iron Rapsodo MLM2PRO session (Range mode, RPT balls) — the dispersion plot and shot table.
- Three swing videos exported straight from the Rapsodo app — a mix of good and bad swings, uploaded without labels so the coach had to figure out which was which from the numbers burned into each clip.
- Level set to "Enthusiast." Total time from upload to full coaching: about 30 seconds.
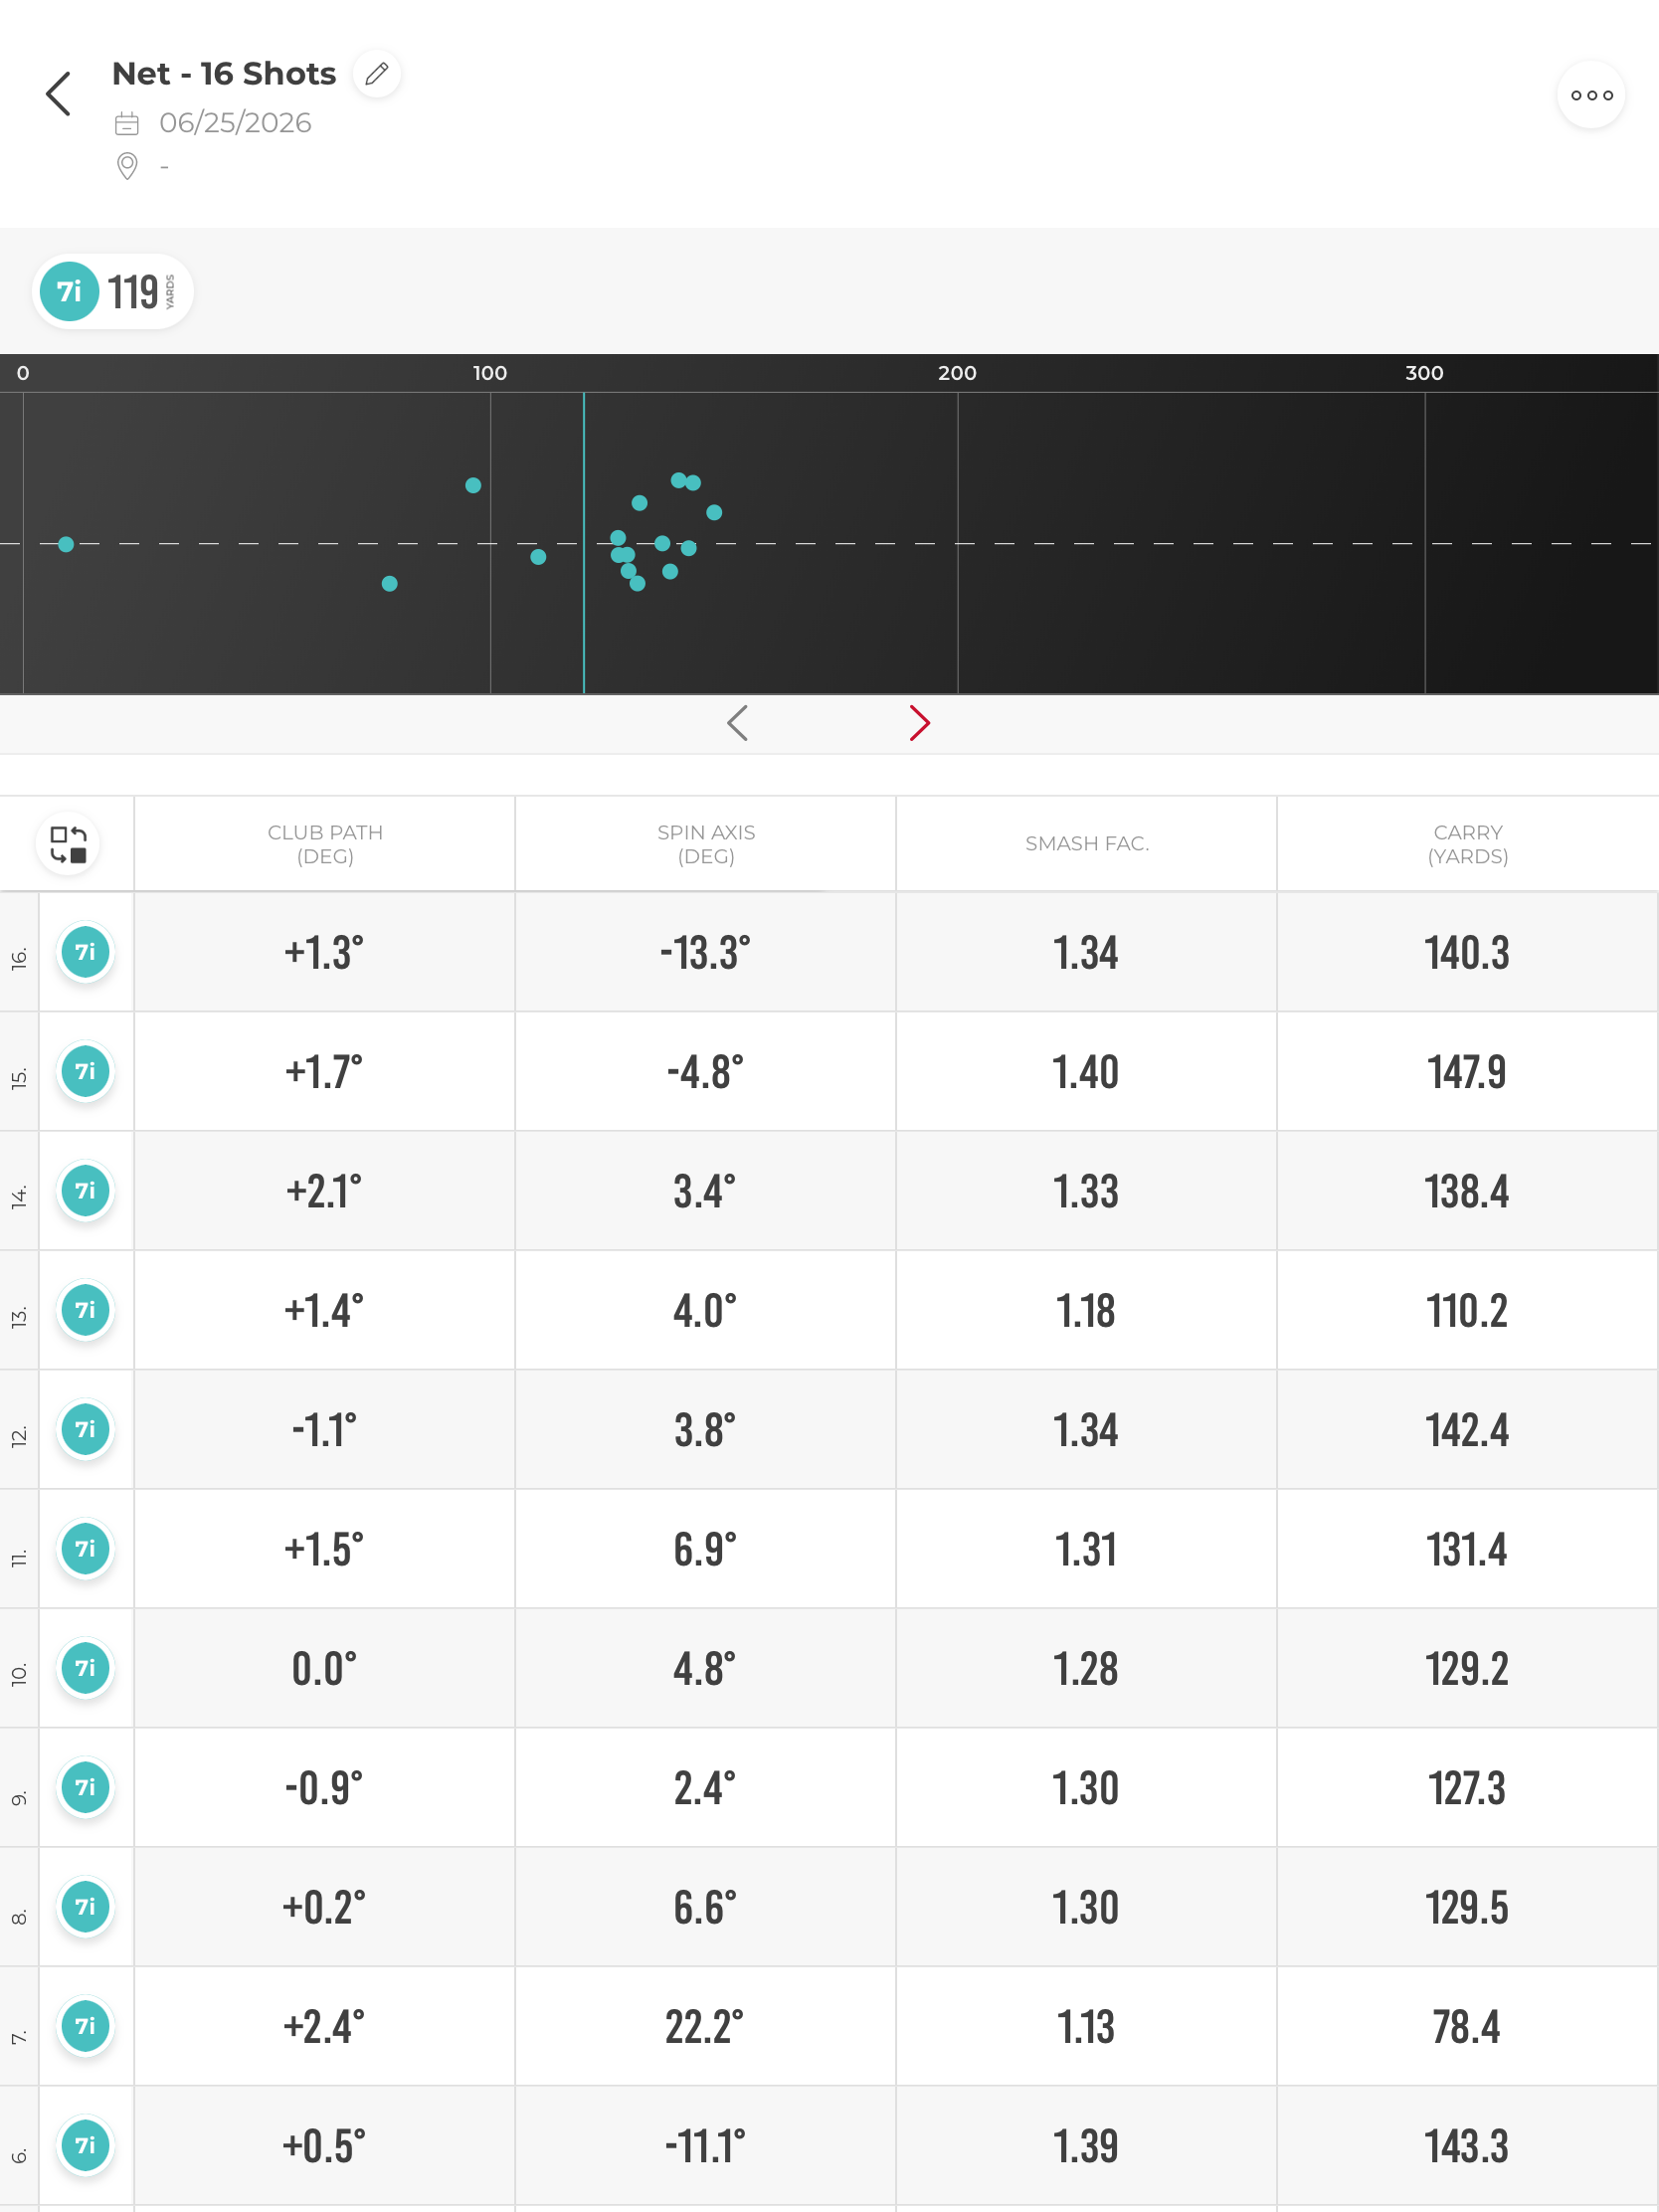
Two things to watch for as you read: the coach matches each swing video to its exact row in the session table, and when something can't be known from the data, it says so instead of guessing.
What came back — unedited
Bottom Line
Your best swing (Swing 2, 148 yards) produces nearly 20 more yards than your worst (Swing 1, 129 yards) with the exact same club speed — meaning the difference is entirely contact quality, not effort. The session data shows a consistent rightward spin axis (positive numbers = fade/push tendency) across most shots, with a couple of big outliers that cost you badly. The single biggest thing to fix is staying in your posture through impact — your worst swings show you standing up and your hips thrusting toward the ball, which kills both contact and direction.
Session Summary
16 shots, 7-iron, MLM2PRO with RPT balls (spin reliable).
| Metric | What it means | Your range | Notes |
|---|---|---|---|
| Carry | How far the ball flies in the air | 78–148 yds | Huge spread — contact is the culprit |
| Smash Factor | Ball speed ÷ club speed = contact quality; 1.38–1.40 is ideal for a 7-iron | 1.13–1.40 | Two shots below 1.20 are mishits |
| Club Path | Which direction the clubhead is traveling at impact; positive = slightly in-to-out (draw-friendly) | -1.1° to +2.4° | Very consistent — this is a strength |
| Spin Axis | Tilt of the ball's spin that causes curve; negative = curves left (draw), positive = curves right (fade) | -13.3° to +22.2° | Most shots are slightly positive (gentle fade); two big outliers |
Shot #15 (smash 1.40, 147.9 yds) and Shot #16 (smash 1.34, 140.3 yds with a -13.3° draw) are your best strikes. Shot #13 (smash 1.18, 110.2 yds) and Shot #7 (smash 1.13, 78.4 yds with +22.2° spin axis) are the clear mishits. The scatter plot confirms most shots cluster around 130–148 yards, with a few stragglers well short and left.
Video matching:
- Swing 1 (129 yds, 96 mph ball speed, 75 mph club speed) → most likely Shot #9 (127.3 yds, smash 1.30) or Shot #8 (129.5 yds, smash 1.30)
- Swing 2 (148 yds, 105 mph ball speed, 75 mph club speed) → Shot #15 (147.9 yds, smash 1.40) — your best strike of the session
- Swing 3 (140 yds, 103 mph ball speed, 76 mph club speed) → Shot #16 (140.3 yds, smash 1.34) or Shot #14 (138.4 yds, smash 1.33)
What's Working
- Club path is excellent. Nearly every shot in the session is between -1.1° and +2.4° — that's a beautifully neutral-to-slightly-inside path. Most golfers fight a steep, outside-in path that causes slices; you don't have that problem at all.
- Your best smash factor (1.40 in Swing 2) is genuinely elite for a 7-iron. When you stay in your posture, you find the center of the face and the ball just jumps off the club — 105 mph ball speed from 75 mph club speed is proof of that.
- Consistent club speed. All three video swings show 75–76 mph — you're not over-swinging or decelerating. The speed is there; it just needs to be delivered cleanly more often.
- Address position looks solid. At setup in all three swings, your posture, ball position, and spine angle look athletic and repeatable — a good foundation to build on.
What to Fix
1. Early Extension — Standing Up Through Impact (Priority #1)
This is the root cause of your contact inconsistency. "Early extension" means your hips thrust toward the ball and your spine straightens up during the downswing, instead of staying bent over and rotating around your original posture. When this happens, the club has to reroute to find the ball — sometimes it catches it thin (low smash, short carry), sometimes it catches it on the heel or toe (big spin axis numbers, offline shots). This is exactly what separates your 129-yard swing from your 148-yard swing.
2. Spin Axis Consistency — Occasional Big Fades/Pushes
Your club path is fine, but several shots show spin axis of +6° to +22° — meaning the ball is curving noticeably right. With a good path, this is almost certainly a contact-location issue (heel strikes) caused by the same early extension above. Fix #1 and this will largely self-correct.
Swing + Data Fusion
Per-swing metrics:
| Swing | Carry | Ball Speed | Club Speed | Smash Factor | Launch Angle | Quality |
|---|---|---|---|---|---|---|
| Swing 1 | 129 yds | 96 mph | 75 mph | 1.28 | 17.0° | Worst strike |
| Swing 2 | 148 yds | 105 mph | 75 mph | 1.40 | 15.7° | Best strike |
| Swing 3 | 140 yds | 103 mph | 76 mph | 1.36 | 13.7° | Mid strike |
🏆 Best strike = Swing 2 (smash 1.40 — near-perfect center contact, 19 more yards than Swing 1 from identical club speed).
🎯 Straightest/most accurate = Cannot determine from video metrics alone, but Swing 3's lower launch angle (13.7°) and solid smash suggest a slightly more compressed, controlled ball flight.
These are different swings — if you want distance, replicate Swing 2. If you want control and consistency, study Swing 3.
The comparative story — what Swing 2 does that Swing 1 doesn't:
At the top of the backswing, all three swings look similar — a reasonable shoulder turn with the club in a workable position. The difference shows up in the transition and through impact.
In Swing 1, as you start the downswing, your hips visibly drive toward the ball (toward the camera) rather than rotating around your body. By impact, your spine has straightened noticeably — you've lost the forward bend you had at address. Your trail heel also lifts early and your weight appears to stay back. The result: the club arrives at impact on a slightly different arc than where you set up, producing a glancing blow — smash factor 1.28, ball speed only 96 mph despite 75 mph club speed.
In Swing 2, your lower body initiates the downswing with rotation rather than a forward thrust. Your hips turn through while your upper body stays over the ball longer — you maintain that spine angle through the strike. The club finds the center of the face. Same 75 mph club speed, but 105 mph ball speed and 148 yards. That 9 mph difference in ball speed is entirely from better contact, not more effort.
Swing 3 is in between — good rotation, but your trail heel lifts slightly earlier than Swing 2, suggesting a touch of the same hip-thrust pattern creeping back in. The smash (1.36) and carry (140 yds) reflect that middle-ground result.
The single biggest variable to change: keep your hips rotating around your body through impact rather than thrusting them toward the ball. Everything else — path, speed, tempo — is already in good shape.
Your Drills
Drill 1: The Chair Drill (Stop Standing Up Through Impact)
What it fixes: Trains your hips to rotate properly instead of thrusting toward the ball — directly addresses the early extension that's costing you 15–20 yards on your mishits.
How to do it:
- Set up a chair (or a stool, or stand next to a wall) so that the seat/edge is positioned just behind your backside — lightly touching your glutes at address. You want it close enough that you can feel it.
- Take your normal address position with a 7-iron (or even just a club in your hands with no ball to start).
- Make your backswing. As you turn back, your backside should stay in contact with the chair — your hips rotate into it, not away from it.
- Now swing through. The goal is to keep your backside touching the chair all the way through impact. Your hips should rotate around, not lunge forward. If your hips thrust toward the ball, your backside will come off the chair — that's the fault you're training away from.
- Do 10 slow practice swings feeling the chair contact, then hit 5 balls with the same sensation. The cue is: "keep my butt on the chair through the hit."
- After 5 balls, check your MLM2PRO — you should see smash factor climbing toward 1.35+ as contact improves.
How you'll know it's working: Your backside stays in contact with the chair through the strike, and on the monitor your smash factor becomes more consistently 1.35 or higher. You'll also feel like you're "covering the ball" more — staying over it rather than popping up.
Drill 2: Feet-Together Drill (Groove Rotation and Balance)
What it fixes: When your feet are together, you physically cannot thrust your hips forward without falling over — it forces your body to rotate properly and stay balanced. This reinforces the same hip rotation pattern from Drill 1, but trains it through feel rather than a prop.
How to do it:
- Place your feet together (heels and toes touching) and tee up a ball or just hit off a mat with your 7-iron.
- Make half-speed swings — you're not trying to crush it, you're training the pattern. Aim for about 60% effort.
- Focus on staying balanced throughout. If you thrust your hips forward, you'll feel yourself tipping toward the ball and your strike will be terrible — instant feedback.
- Make 10 swings with feet together, paying attention to staying tall and rotating your belt buckle toward the target through impact.
- Then step back to your normal stance and hit 5 balls, trying to carry that same rotational feeling into your full swing.
- Repeat the cycle: 10 feet-together → 5 normal stance. Do 3 rounds.
How you'll know it's working: You can make clean, solid contact even with feet together (the ball won't go far, but it should feel centered). When you return to normal stance, your follow-through will look more like Swing 2 — chest facing the target, balanced on your lead foot, trail heel up naturally rather than pushed up by a forward lunge.
Want this for your sessions?
Rangelytics is in a private beta for Rapsodo MLM and MLM2PRO owners. If you have an invite code, you're 30 seconds from your own analysis.
Analyze my session →No invite code? Leave your email and you'll get first access (and beta pricing) at launch: